WilsonPro Enterprise 1300 and 4300: A Hands-on Review
By Dan M on
What’s New
Multi-Tower Targeting (MTT) Technology

- 700 MHz - Bands 12 and 13
- 850 MHz - Band 5
- 1900 & 1700/2100 MHz - Bands 4 and 25

What’s Better
The 1300/1300R and 4300/4300R are now more powerful than their predecessors, both on the uplink and downlink sides. This means that, with a strong outside signal, you can get more coverage from these systems than the previous versions. The previous WilsonPro 1000/1000R and 1000C had a maximum downlink output power of +15 dBm while the new Wilson Pro 1300/1300R has a maximum downlink output power of +17 dBm. This small improvement can help improve the coverage margin in any system and is a welcome benefit. The previous WilsonPro 4000/4000R had a maximum downlink output power of +12 dBm for each of the four output ports while the new WilsonPro 4300/4300R has a maximum downlink output power of +17 dBm on each of the four output ports. In this case, the additional +5 dBm of output power can provide up to double the coverage area when compared to the previous version. Additionally, the new amplifiers feature touchscreen displays which are clearer, provide more information, and are easier to navigate than the previous displays with the 4-way keypad.What Hasn’t Changed But Is Still Great
The new wall mount amplifiers feature the same rugged construction and passive cooling as the previous versions while the rack-mount kits include a fan. All amplifiers generate heat so the cooler they run, the longer they will typically last. The new systems feature a built-in power supply with a locking power cord to avoid accidentally unplugging the system. These systems are backed by Wilson Electronics’ 30-day money-back guarantee (extended to 60 days for UberSignal customers!) and their 3-way manufacturer’s warranty. Each system also comes with Wilson’s XDR technology which means that the amplifier can continue to operate even with very strong existing outside signals by having a fully dynamic range Auto Gain Control (AGC) system. Other amplifiers, like the Wilson Pro 70 Plus can only turn down the gain a limited amount, so if the outdoor signal is very strong, the amplifier may have to shut down on that band. With XDR, the amplifier should never have to shut down due to strong outside signals.What Can Be Improved
These new systems are a welcome upgrade and are the inaugural amplifiers in Wilson’s new Enterprise line. We’re very excited at the possibilities that they provide. Of course, no product is perfect so here are a few of our initial observations. Each amplifier comes with a great touchscreen display, but you currently can’t make any configuration changes like disabling bands or enabling the MTT technology through the display. Instead, you need to connect your computer to the local Ethernet port and make changes through the web-based administration system. According to WilsonPro, this was a conscious decision to limit the possibility of untrained users being able to make changes. This certainly makes sense, but it could have also been accomplished by requiring a passcode before making any changes. Most people will connect to the WilsonPro Cloud using the on-board cellular modems (>90% according to Wilson). However, if you do decide to use an Ethernet connection and you have one of the new rack-mount amplifiers, the Ethernet port is behind a door on the front of the amplifier, not on the rear with the other cable connections. This is mostly cosmetic and is actually a benefit if you only need access for temporary configuration changes. Depending on how often you need the Ethernet port, some people will think this is a positive and others may think it’s a negative. Lastly, the new Multi-Tower Targeting technology is a great development, but it’s important to understand its limitations.- 700 MHz (Bands 12 and 13) is typically used by Verizon and AT&T nationwide with T-Mobile and US Cellular also having vast spectrum holdings. In most areas, there will be three difference carriers (possibly on three different towers) all broadcasting on 700 MHz. Even with MTT, there is still only one 700 MHz port, so you’ll need to figure out which carrier you most want to support and aim the 700 MHz antenna at that tower.
- The Cellular band (850 MHz Band 5) is arguably the least important to support. It has two blocks so generally there are two different carriers on the cellular band. This band does get its own port, but again, you likely have at least two carriers represented here.
- The PCS (1900 MHz Band 2/25) and AWS (1700/2100 MHz Band 4) are typically the most important bands to support because it’s where the most spectrum is available. More spectrum means faster download speeds and more customers that can be supported. In general, all four major carriers will have networks running on these two frequency bands so you have potentially four or more towers and just one port for both Bands 4 and 25.
Unboxing
The new WilsonPro Enterprise 1300/1300R and 4300/4300R come in very large boxes, just like their predecessors. The boxes measure approximately 29” x 20” x 22” so any sort of expedited shipping, especially on multiple systems, will quickly get expensive! The inside of the box is divided into two layers. The top layer includes the amplifier, power cable, and instruction manual. The lower portion includes the additional accessories.
- 1 x Outdoor Directional Antenna
- 1 x Lightning Protector
- 1 x 2 ft Cable
- 2 x 100 ft Cables
- 1 x Indoor Dome Antenna
- 1 x Outdoor Directional Antenna
- 1 x Lightning Protector
- 1 x 2 ft Cable
- 5 x 100 ft Cables
- 4 x Indoor Dome Antenna
Mounting the Amplifier
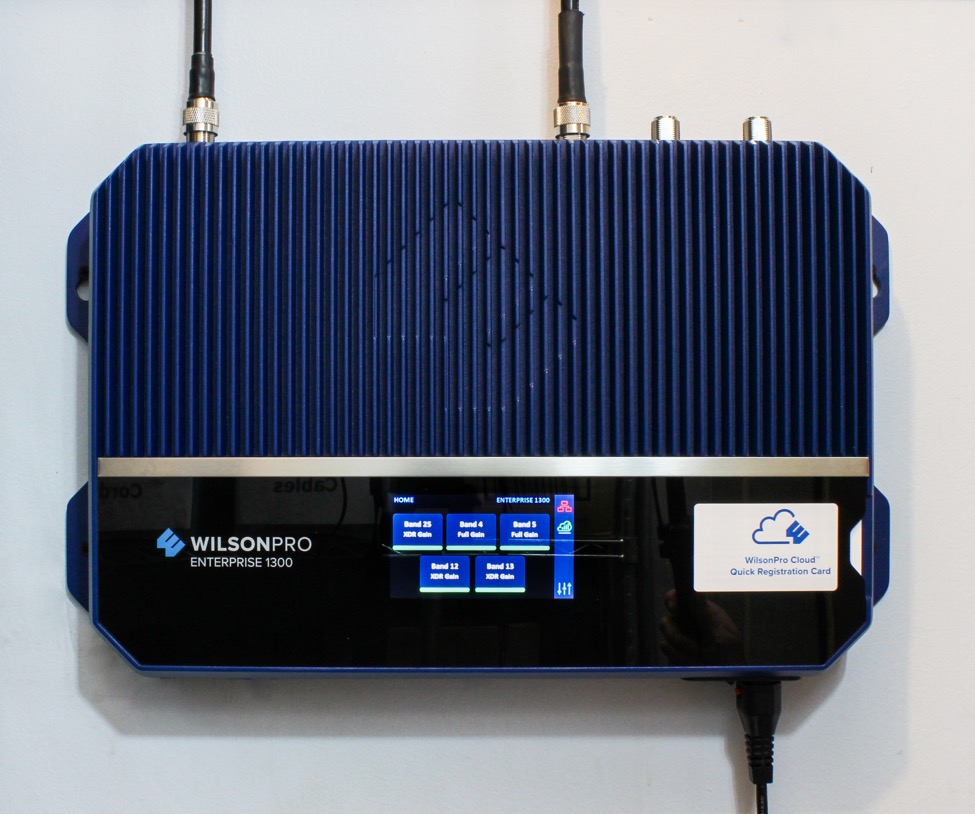
The wall-mount version of the amplifier features top brackets with large openings at the bottom so you can attach two screws to the wall with the correct spacing and then hang the amplifier on those two screws before fully tightening the top and securing it in place with two screws through the bottom mounting holes. This makes it possible for one person to easily and safely install one or more amplifiers without needing a second set of hands. The rack-mount amplifiers do not use rails and instead have rack mounting brackets on the front that fit a standard 19-inch rack.Initial Power On – LCD Display
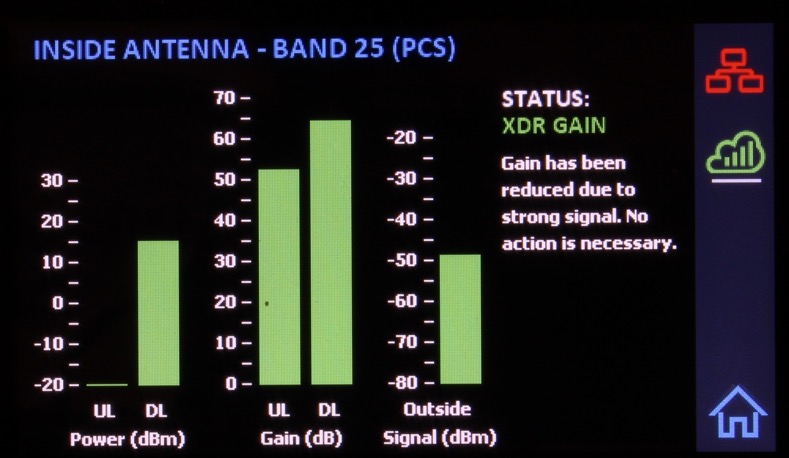
When powering on the amplifier, the LCD display will take a few seconds to come alive and then a WilsonPro loading indicate will appear as the software loads. The entire bootup process takes 5 to 10 seconds. After that, the dashboard screen will be displayed showing the five frequency bands and an overview of how well each is working. The frequency bands are color coded based on the state of the band. Green bands are either at full gain or XDR gain. XDR gain means that the amplifier is running at full output power on that band and has had to reduce its gain to stay within the FCC allowed power levels. Orange is for bands experiencing Oscillation or feedback between the outdoor and indoor antennas. Red bands are ones that have shutdown via amplifier configuration.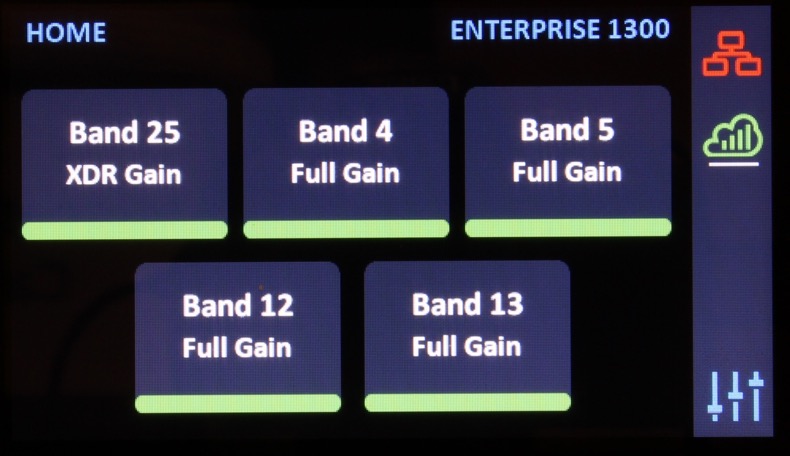
- The uplink (UL) bars (from cell phone to tower) will usually be very low and may be off. This is measuring the power from inside cell phones back to the cell tower so unless phones are actively using the band, you won’t see anything on the UL bar chart.
- These values are a measure of the entire frequency band, not any individual carrier or channel (with the exception of Band 13 which will nearly always be Verizon).
- You are typically not going to want to use this information to aim your outdoor antenna. Instead, you need to use something that can measure the individual carrier frequencies, like a cell phone or a signal meter, to properly aim the outdoor antenna.
Cloud Connectivity
On the right of the screen are two Wilson Cloud indicators. At the top right is the local ethernet connection indicator. Tapping on it shows the following screen which explains what the different colors mean:- Green: The amplifier is connected to a network and the Wilson Cloud
- Yellow: The amplifier is connected to a non-functioning network. This will happen directly connected to a laptop or when the network does not have a DHCP server.
- Red: The amplifier is configured to use the Ethernet port but there is no active connection.
- White: The Ethernet port is disabled.

- Green: The amplifier is configured to use the cellular modem and there is a good connection to the Wilson Cloud. The icon will also show the strength of the signal in bars.
- Yellow: The cellular modem is connected, but the outdoor signal is too weak for the cellular modem to reliably communicate with the Wilson Cloud.
- Red: The cellular modem has no service.
- White: The amplifier is not configured to use the built-in cellular modem.

Settings
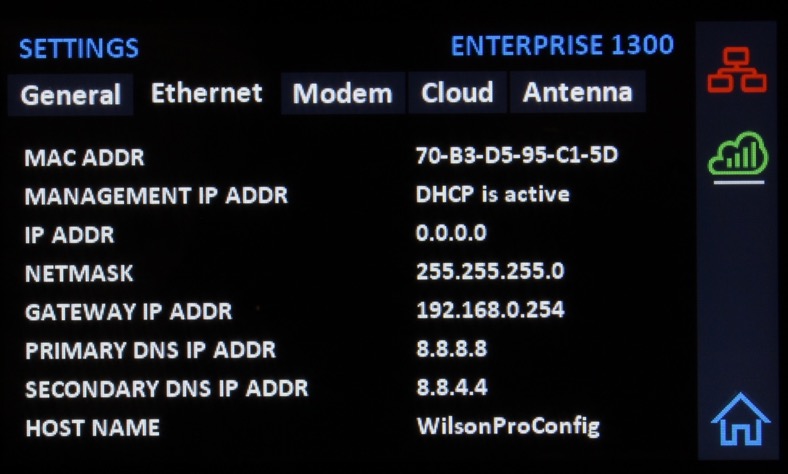
From the Home screen on the display, tapping on the bottom-right corner will take you to a settings screen where you can see additional information about the amplifier. General The initial settings screen brings you to the General tab where it shows some overview information including the model, serial number, hardware version, firmware versions, uptime, and more.


- Connect one end of the Ethernet cable to the amplifier’s Ethernet port and the other end of the cable to a computer.
- Make sure the computer’s Wi-Fi connection is turned off or disconnected.
- On the amplifier, access the Settings menu by tapping the icon in the bottom right corner of the display.
- Tap on the Ethernet tab. Look for the IP Address line. If the amplifier doesn’t have an IP address listed, wait for a minute and one should show up. Write down the IP address that should start with 169.xxx
- On your computer, open a web browser and type in the IP address from the amplifier and press enter. That should open the web administration portal.
- Login to the web interface. The default username and password are both set to “admin”.
- Change the login password
- Change the outside antenna port configuration from Common to Split (MTT)
- Turn bands on and off
- Use the antenna tuner utility to aim the outdoor antenna
- See the amplifier status including the output power
- See the cellular modem status
- Change the default communication preferences for the WilsonPro Cloud connectivity
